Lesson 3: Understanding Film Speed - ISO
When you buy film, if you buy film, you undoubtedly are faced with the decision of which film speed to buy. Most people just purchase 400-speed film and go with that because that's what we've always been told to buy. The film's speed, or ISO, does make a big difference; and understanding how the speed of the film affects the final image can make all the difference between a good picture and one that does not turn out. Even if you use a digital camera, you can benefit from this knowledge as almost every digital camera made gives you the option to set a simulated ISO speed.
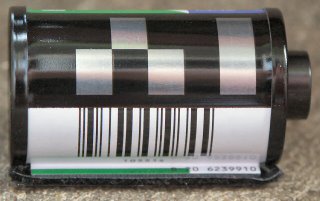
The good news is that after you make the choice of which film to buy, the camera can do the rest. Next time you load film into your camera, take a look at the film cassette. Those black and silver alternating blocks are coded (DX coded) with all the information about the film (ISO, number of exposures...). Your camera automatically reads that information and changes its settings accordingly.
Warning: Technical information - Skip this paragraph if you'd like. Film is plastic, but what sets it apart from your ordinary Tupperware is the fact that the plastic strip is coated with an emulsion containing light-sensitive silver halide salts. It is the size of these silver halide salts that determine the light sensitivity of the film, or ISO. The larger the salt crystal, the more light sensitive the film; the smaller the salt crystal, the less light sensitive the film. Having film that is more light sensitive often makes photography easier because the picture can be taken faster - even in low light situations. The only major drawback to having a film with a higher ISO is those larger crystals. The crystals reduce the resolution of the final image, resulting in film grain. If you wish to enlarge the final print, you're just going to make the grain even larger yet. You'll need to plan carefully and use the film with the smallest grain (lowest ISO) possible for your available lighting. I almost always use ISO 100 film for everything outdoors during the day, and even some indoor scenes. There are times when this isn't possible, however, and using ISO 400 or less will allow you to print great pictures without noticing any distracting film grain in most scenarios.
Okay, back to the easy stuff - if you're still with me here. The bottom line is that you'll want to think about where you'll be taking your pictures. If you're at an outdoor picnic, at an amusement park, or any other relatively "light" place - use a film rated ISO 100 or 200. If you are going to be photographing primarily indoors, or in other low-light places, use ISO 400. You can easily find faster films, such as ISO 800, 1600, or 3200 for special situations. If, for instance, you're going to a high school graduation in a dimly lit gym and you need to quickly capture those important moments, choose ISO 800. Just don't use ISO400 to take pictures outside, choose a lower ISO and take better pictures!
Review: The higher the ISO, the more light sensitive the film, and the quicker the camera will be able to take the photo. The only catch with a high ISO is the film grain, and thus the lower resolution. Lower the ISO, and you'll also lower the light sensitivity of the film, but you'll have a better resolution.
Importance of this nonsense: If you boil all this down to the nitty gritty, there is an important lesson to be learned. If you used ISO 100 film to take pictures in your living room, lit only by a small lamp, in the middle of the night, you're going to be disappointed. The final picture will be very dark and very blury. Why blury? Because the light sensitivity of the film is so low, the camera will have to stay "open" on the scene longer, like maybe a whole entire second or two, to get enough light to make the picture. This means that all the movement your subject produced during that whole second will be recorded in the final picture as a blur. By using ISO 800, the picture would be a-ok. On the other side of the coin, if you used ISO 800 film outside, on a sunny day, in Phoenix Arizona, the enormous amount of light, coupled with the high sensitivy of the film will make the final picture very light (if not white) and washed out!
As a side note, for color film, two of the best moderately-priced choices are Kodak and Fuji. Kodak is better at capturing red and orange tones more true-to-life while Fuji is better at capturing green and blue tones more true-to-life. This means that for people - Kodak, and for landscape - Fuji. Since the Kodak box is yellow and the Fuji box is green, you should have no trouble remembering this.
For more detailed information on ISO, (as if this wasn't already torture!) check out the Wikipedia page on film speed. Future lessons will take your new knowledge farther... if you can stick with the program.
The good news is that after you make the choice of which film to buy, the camera can do the rest. Next time you load film into your camera, take a look at the film cassette. Those black and silver alternating blocks are coded (DX coded) with all the information about the film (ISO, number of exposures...). Your camera automatically reads that information and changes its settings accordingly.

Warning: Technical information - Skip this paragraph if you'd like. Film is plastic, but what sets it apart from your ordinary Tupperware is the fact that the plastic strip is coated with an emulsion containing light-sensitive silver halide salts. It is the size of these silver halide salts that determine the light sensitivity of the film, or ISO. The larger the salt crystal, the more light sensitive the film; the smaller the salt crystal, the less light sensitive the film. Having film that is more light sensitive often makes photography easier because the picture can be taken faster - even in low light situations. The only major drawback to having a film with a higher ISO is those larger crystals. The crystals reduce the resolution of the final image, resulting in film grain. If you wish to enlarge the final print, you're just going to make the grain even larger yet. You'll need to plan carefully and use the film with the smallest grain (lowest ISO) possible for your available lighting. I almost always use ISO 100 film for everything outdoors during the day, and even some indoor scenes. There are times when this isn't possible, however, and using ISO 400 or less will allow you to print great pictures without noticing any distracting film grain in most scenarios.
Okay, back to the easy stuff - if you're still with me here. The bottom line is that you'll want to think about where you'll be taking your pictures. If you're at an outdoor picnic, at an amusement park, or any other relatively "light" place - use a film rated ISO 100 or 200. If you are going to be photographing primarily indoors, or in other low-light places, use ISO 400. You can easily find faster films, such as ISO 800, 1600, or 3200 for special situations. If, for instance, you're going to a high school graduation in a dimly lit gym and you need to quickly capture those important moments, choose ISO 800. Just don't use ISO400 to take pictures outside, choose a lower ISO and take better pictures!
Review: The higher the ISO, the more light sensitive the film, and the quicker the camera will be able to take the photo. The only catch with a high ISO is the film grain, and thus the lower resolution. Lower the ISO, and you'll also lower the light sensitivity of the film, but you'll have a better resolution.
Importance of this nonsense: If you boil all this down to the nitty gritty, there is an important lesson to be learned. If you used ISO 100 film to take pictures in your living room, lit only by a small lamp, in the middle of the night, you're going to be disappointed. The final picture will be very dark and very blury. Why blury? Because the light sensitivity of the film is so low, the camera will have to stay "open" on the scene longer, like maybe a whole entire second or two, to get enough light to make the picture. This means that all the movement your subject produced during that whole second will be recorded in the final picture as a blur. By using ISO 800, the picture would be a-ok. On the other side of the coin, if you used ISO 800 film outside, on a sunny day, in Phoenix Arizona, the enormous amount of light, coupled with the high sensitivy of the film will make the final picture very light (if not white) and washed out!
As a side note, for color film, two of the best moderately-priced choices are Kodak and Fuji. Kodak is better at capturing red and orange tones more true-to-life while Fuji is better at capturing green and blue tones more true-to-life. This means that for people - Kodak, and for landscape - Fuji. Since the Kodak box is yellow and the Fuji box is green, you should have no trouble remembering this.
For more detailed information on ISO, (as if this wasn't already torture!) check out the Wikipedia page on film speed. Future lessons will take your new knowledge farther... if you can stick with the program.
posted by CThompson at 8:21 AM
![]()


0 Comments:
Post a Comment
<< Home